These are some of the main programs which are used for generating content for this blog:
For content generation:
For screen shots:
For image editing:
For blog publishing:
I thought I should say thanks to all the software wizards who make it possible for me to produce the content I am sharing. Thank you all.
Monday, July 6, 2009
Sunday, June 28, 2009
Opal: Old School in the nicest possible way
Once in a while, only once in a while, you get exposed to software which compels you to change your workflow. I discovered a piece of software like that just the other week: Opal. Available from here , it is not new software. Actually it has been around for a while, but I never had gotten around to checking it out. I finally did, and boy, is it sweet.
If you think in outlines and like lists, you have to check out Opal. It is simple outlining software done right. It should be. Opal has been around since 1986 in its various incarnations. Originally called Acta, and now called Opal, it has a very long and rich heritage. You can read about its history here.
Usage:
Firstly, it is incredibly fast. It launches instantaneously. Instantly responsive software, it is an absolute treat to use. It is an outlining program, so it looks like this:

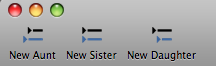
Very interestingly, it conceptualizes the levels of an outline as aunts, sisters and daughters. The hierarchy is Aunts>Daughters. Sisters are peer-level topics.
This is explained through the next two diagrams:
Topics at the root of the outline are aunts. They might have sisters.
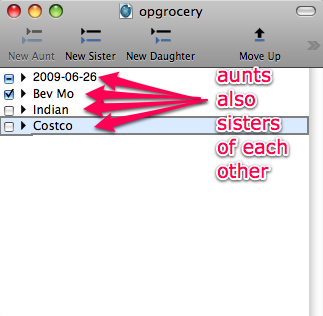
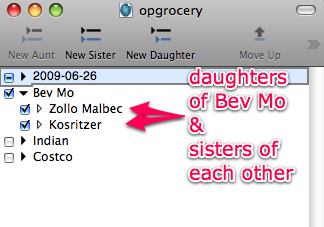
Daughters are descendants of aunts and they are sisters to each other.
You hit enter to get a new topic, or you use the toolbar buttons. You click on the New Aunt button to get a topic at the level above where you are in the outline. Anytime you are working in the outline, you can click the New Sister button to get another topic at the same level of the outline that you have been working on. To get a topic at a level lower than the one you are working on, you can click on the New Daughter icon.
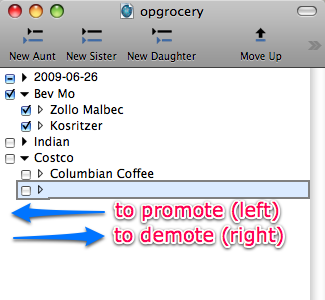
I must say that I much prefer keyboard commands to clicking on icons. Opal lets me do this easily. I hit return to get a new topic, then I can choose to keep it at the level it is or to promote it, I can press the keyboard command: Command +Shift+L (for left). To demote it, I can press the keyboard: Command +Shift+R (for right). I love this arrangement of the keyboard commands. Visually, taking a topic left, promotes it, while taking a topic right, demotes it. Very intuitive. If you don't like keyboard commands, and have to use the mouse, the icons on the toolbar perform the same functions.
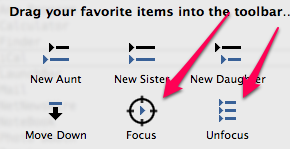
Usage Notes:You need to add a couple of icons to the toolbar. Go to the View>Customize Toolbar... option.
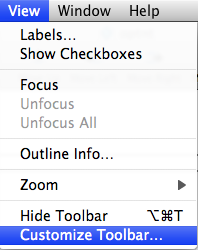
Take the two icons, Focus and Unfocus, and add it to the toolbar.
What do these do? You see the document in the following figure:
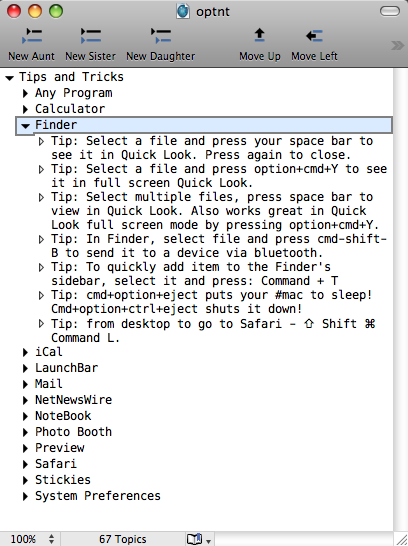
I want to work only on the Finder section and ignore the rest of the document. This becomes even more important when I have a lot of topics and sub-topics in the document. Just press the Focus icon in the toolbar and you get this:
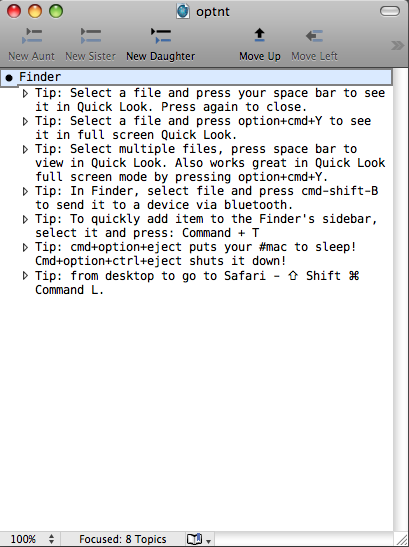
Work on your section and press the Unfocus icon to get the whole document to concentrate on again. Very useful, when you want to dig deep into parts of an outline.
Usage Note: You get checkboxes by going to the View>Show Checkboxes menu item.
Usage Note: Assign keyboard commands to Focus, Unfocus and Unfocus All. The program doesn’t ship with keyboard commands for the Focus, Unfocus and Unfocus All menu options. You might need those. Go to the Keyboard and Mouse preference pane. Click on the Keyboard Shortcuts Tab.

Scroll to the bottom of the list. Highlight Application Keyboard Shortcuts and click on the + button at the bottom of the dialog box.
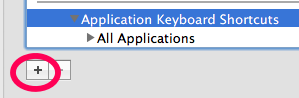
You will get a drop down sheet.
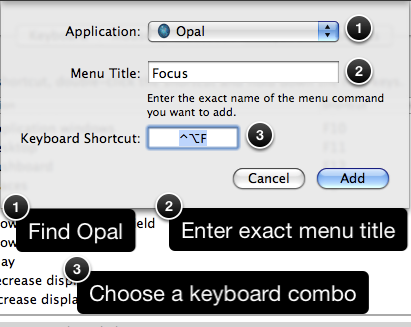
The steps are illustrated in the figure. After completing the steps, press the Add button. Repeat the process twice more with the only changes being the Unfocus and Unfocus All, Menu Title entries. Now you have three keyboard commands which make this feature much more easier to access.
Usage Note: When you mount the disk image of Opal, you will find a PDF file on the image called All About Outliners. You should read this to get an excellent overview of what you can expect from an outlining program.
Recommendation: There are lots of outliners available in the Macintosh marketplace. One of the main ones is a product called OmniOutliner which I am going to cover in a future post. Opal more than holds its own in this marketplace. It is fast, extremely responsive and very intuitive. The software seems to meld away to the background and lets you concentrate on the task in hand, making outlines. It is very well-thought out software with a rich heritage which I am falling in love with. It definitely has found a place in my workflow.
If you think in outlines and like lists, you have to check out Opal. It is simple outlining software done right. It should be. Opal has been around since 1986 in its various incarnations. Originally called Acta, and now called Opal, it has a very long and rich heritage. You can read about its history here.
Usage:
Firstly, it is incredibly fast. It launches instantaneously. Instantly responsive software, it is an absolute treat to use. It is an outlining program, so it looks like this:
Very interestingly, it conceptualizes the levels of an outline as aunts, sisters and daughters. The hierarchy is Aunts>Daughters. Sisters are peer-level topics.
This is explained through the next two diagrams:
Topics at the root of the outline are aunts. They might have sisters.
Daughters are descendants of aunts and they are sisters to each other.
You hit enter to get a new topic, or you use the toolbar buttons. You click on the New Aunt button to get a topic at the level above where you are in the outline. Anytime you are working in the outline, you can click the New Sister button to get another topic at the same level of the outline that you have been working on. To get a topic at a level lower than the one you are working on, you can click on the New Daughter icon.
I must say that I much prefer keyboard commands to clicking on icons. Opal lets me do this easily. I hit return to get a new topic, then I can choose to keep it at the level it is or to promote it, I can press the keyboard command: Command +Shift+L (for left). To demote it, I can press the keyboard: Command +Shift+R (for right). I love this arrangement of the keyboard commands. Visually, taking a topic left, promotes it, while taking a topic right, demotes it. Very intuitive. If you don't like keyboard commands, and have to use the mouse, the icons on the toolbar perform the same functions.
Usage Notes:You need to add a couple of icons to the toolbar. Go to the View>Customize Toolbar... option.
Take the two icons, Focus and Unfocus, and add it to the toolbar.
What do these do? You see the document in the following figure:
I want to work only on the Finder section and ignore the rest of the document. This becomes even more important when I have a lot of topics and sub-topics in the document. Just press the Focus icon in the toolbar and you get this:
Work on your section and press the Unfocus icon to get the whole document to concentrate on again. Very useful, when you want to dig deep into parts of an outline.
Usage Note: You get checkboxes by going to the View>Show Checkboxes menu item.
Usage Note: Assign keyboard commands to Focus, Unfocus and Unfocus All. The program doesn’t ship with keyboard commands for the Focus, Unfocus and Unfocus All menu options. You might need those. Go to the Keyboard and Mouse preference pane. Click on the Keyboard Shortcuts Tab.
Scroll to the bottom of the list. Highlight Application Keyboard Shortcuts and click on the + button at the bottom of the dialog box.
You will get a drop down sheet.
The steps are illustrated in the figure. After completing the steps, press the Add button. Repeat the process twice more with the only changes being the Unfocus and Unfocus All, Menu Title entries. Now you have three keyboard commands which make this feature much more easier to access.
Usage Note: When you mount the disk image of Opal, you will find a PDF file on the image called All About Outliners. You should read this to get an excellent overview of what you can expect from an outlining program.
Recommendation: There are lots of outliners available in the Macintosh marketplace. One of the main ones is a product called OmniOutliner which I am going to cover in a future post. Opal more than holds its own in this marketplace. It is fast, extremely responsive and very intuitive. The software seems to meld away to the background and lets you concentrate on the task in hand, making outlines. It is very well-thought out software with a rich heritage which I am falling in love with. It definitely has found a place in my workflow.
Sunday, June 21, 2009
Quick Tip: Quicklook
Tip: Select a file and press your space bar to see it in Quick Look. Press again to close.
Tip: Select a file and press option+cmd+Y to see it in full screen Quick Look.
Tip: Select multiple files, press space bar to view in Quick Look. Also works great in Quick Look full screen mode by pressing option+cmd+Y.
Tip: Select a file and press option+cmd+Y to see it in full screen Quick Look.
Tip: Select multiple files, press space bar to view in Quick Look. Also works great in Quick Look full screen mode by pressing option+cmd+Y.
Wednesday, May 13, 2009
AppTrap: Uninstall done right
Installing applications on the Mac is pretty easy. You either have an installer which does its work, or you drag the application from an image file into your applications folder, and you are done. The problem arises when you want to uninstall the application. You can take the application and drag it to trash, but that doesn't do the job completely. Usually the program in the course of its operation installs files: in the Preference folder and in the Application Support folder. It is painful to go around and search for the files it installs, the names are not very intuitive and it turns into a hit-and-miss operation. There are several solutions available for performing this task with more ease. Some of these are shareware: AppZapper, AppDelete, CleanApp 3, etc.. Others are freeware: AppCleaner, AppTrap.
I am going to cover AppTrap today.
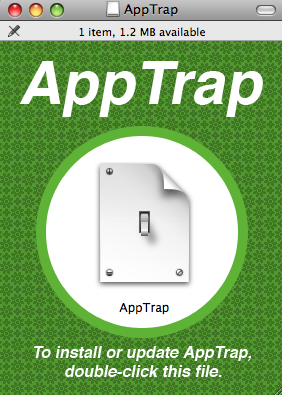
Firstly, download the program from here. After the file has downloaded, double-click the file and the image will mount. Follow the instructions on the image, they are easy.
AppTrap is extremely simple, as you can see, the preferences are very limited. Just two clicks and you are done.
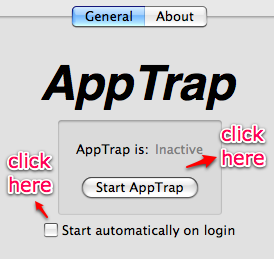
After the two clicks, this is what you are going to get.
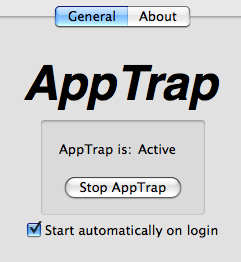
You are done. Now you are ready to go.
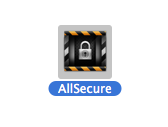
To illustrate, I am going to take a application I love, AllSecure, and I am going to move it to Trash.
As soon as I do that, AppTrap is going to throw up a dialog box, asking me whether I want to move the files associated with AllSecure also to trash, or leave them alone?
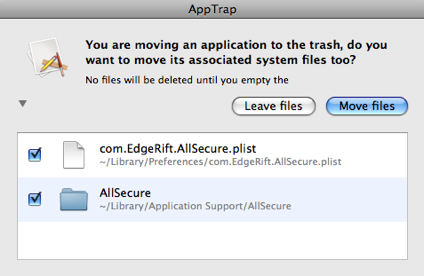
If I was interested in getting rid of AllSecure from my hard drive I would click the Move Files option, and the application and its associated files would be moved to the Trash. Empty trash and they would all be gone from my hard drive. Simple, easy, and quick.
No, I didn't delete the application AllSecure from my hard drive, as I said, I love that program and will cover it in more detail in a coming blog-post.
AppTrap does a fantastic job, and best of all it is free (donations requested).
I am going to cover AppTrap today.
Firstly, download the program from here. After the file has downloaded, double-click the file and the image will mount. Follow the instructions on the image, they are easy.
AppTrap is extremely simple, as you can see, the preferences are very limited. Just two clicks and you are done.
After the two clicks, this is what you are going to get.
You are done. Now you are ready to go.
To illustrate, I am going to take a application I love, AllSecure, and I am going to move it to Trash.
As soon as I do that, AppTrap is going to throw up a dialog box, asking me whether I want to move the files associated with AllSecure also to trash, or leave them alone?
If I was interested in getting rid of AllSecure from my hard drive I would click the Move Files option, and the application and its associated files would be moved to the Trash. Empty trash and they would all be gone from my hard drive. Simple, easy, and quick.
No, I didn't delete the application AllSecure from my hard drive, as I said, I love that program and will cover it in more detail in a coming blog-post.
AppTrap does a fantastic job, and best of all it is free (donations requested).
Tuesday, May 5, 2009
System Preference and Caffeine: No. You can't go to sleep.
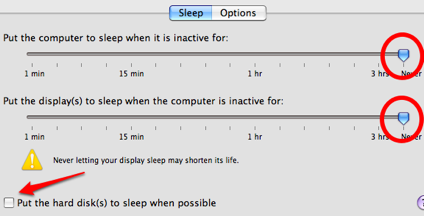
How do I make my computer stay awake? You can go to the Energy Saver preference pane.
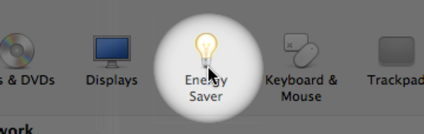
Drag the two sliders highlighted in the picture to the extreme right. This ensures that the computer and the display never go to sleep. Uncheck the "put hard disk(s) to sleep when possible" check-box. You are now ready to stay absolutely awake.
Does this sound like too much work?
You can always get Caffeine to do the job for you. Caffeine is a tiny program which sits in your menu bar. Click it to disable automatic sleep and click it again to get your system energy saving settings back. Caffeine gives you the ability to set up how long you want your Mac to be awake.
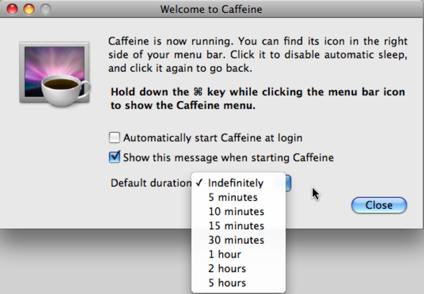
Caffeine also gives you a visual representation of when it is working. Normal sleep is an empty white coffee-cup and awake is the same coffee cup with coffee in it.

Usage Note: To quit, click on the menubar icon while holding down the Command key. You are going to get a drop-down menu and you can quit the program from there.

Drag the two sliders highlighted in the picture to the extreme right. This ensures that the computer and the display never go to sleep. Uncheck the "put hard disk(s) to sleep when possible" check-box. You are now ready to stay absolutely awake.
Does this sound like too much work?
You can always get Caffeine to do the job for you. Caffeine is a tiny program which sits in your menu bar. Click it to disable automatic sleep and click it again to get your system energy saving settings back. Caffeine gives you the ability to set up how long you want your Mac to be awake.
Caffeine also gives you a visual representation of when it is working. Normal sleep is an empty white coffee-cup and awake is the same coffee cup with coffee in it.
Usage Note: To quit, click on the menubar icon while holding down the Command key. You are going to get a drop-down menu and you can quit the program from there.
Monday, May 4, 2009
Shove it into ShoveBox

I am going to cover ShoveBox today. ShoveBox costs $24.95.
Every day you come across snippets of information which you know you want to check out but don't have the time to get to right now. Usually you just drag an URL to the desktop and very soon, your desktop is covered with files and you have no idea what any of them are or when you are really going to get to them. Maybe, you are a little more organized, you have a TextEdit file open in the background and you drag both text and URL's on to the TextEdit file. This is a tad better than the "use the desktop as the box" strategy but it still is not very efficient.
ShoveBox attempts to solve this problem. "ShoveBox catches all those little scraps of information that you can't act on now but would rather not forget. It sits up in your menubar, waiting for you to drag in text, images, URLs, and more." It does a good job of being an application which hides from you when you don't need it and coming to the fore and helping you when you need it. And it is a depository of all the information you want to get to later.

How do you get data into ShoveBox?
In this area ShoveBox really shines. It gives you a myriad of choices. You can drag and drop clippings and files onto the ShoveBox menubar icon and they are added to the Inbox.
You can invoke the Quick Jot panel and type and paste in your input.

or, you can create a new text note and type or paste in your input.
In addition, you can paste in your clipboard contents into ShoveBox.
A feature, which I quite enjoyed was that you could use your iSight camera to create image entries and add them to ShoveBox. I must say that although it is a cool feature, I do not know how useful it would be. The author posits that it is good for taking snaps of diagrams on notes on whiteboards.

In addition it provides a System-wide Services menu to Send to ShoveBox. It also provides a "Save PDF to ShoveBox" option in any Print Dialog. There is also a Browser Bookmarklet which lets you save any page you are on to ShoveBox, it is hidden in the Capturing Items section in the manual.
How do you get data out of ShoveBox?
That process is pretty simple, you can just drag the entries out of ShoveBox into a folder or into another program, or you can choose the export dialog box and it is pretty easy and intuitive a task.
Interesting usage pointers:
It's preferences are very well arranged and gives you the ability to drag in a bookmark as an URL or as a Web Archive, or you can set it to give you a choice every time you drag in an URL.
The interesting panel in the preferences is the Hot Keys assignment panel. This lets you assign a hot key to Open Organizer, Show QuickJot, New Text Note, or Paste to ShoveBox.

Rules: The problem with programs like this is you are half the way through to being organized. You are for all intents and purposes using the Inbox of the program as the depository of files instead of your desktop or any other folder where you have decided to dump your files. The organization is half done, you have to get into the programs Organizer and parse your documents and files into folders to achieve organizational nirvana. Rules are an attempt on the part of the program to automate this process. You can set up various organizational helpers through the Rules panel in the preferences of the program. It helps in the process of organizing.

Usage Notes:
This is a very competitive space. There are a ton of competitors in this market and ShoveBox has some very illustrious competition in the likes of Yojimbo, DevonNote, Together, and EagleFiler to name just a few. ShoveBox does less than each of the other programs in some very significant ways. For instance, it doesn't do tags. It does a few things and what it does it does well. If you are looking for a light organizational tool, this is a well-designed un-intrusive software which helps you get organized.Friday, May 1, 2009
LaunchBar and iCal integration
LaunchBar 5.0 has been updated to release candidate 1. It is a really easy way to add events and To Do's to iCal without having to switch between applications.
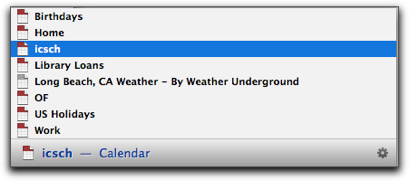
In iCal make a new calendar. Give it an unique name: in my case I called the calendar icsh (short for ical schedule).
You can choose not to create a new calendar and use an existing calendar like Home or Work.
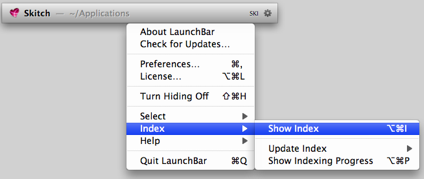
In LaunchBar preferences, go to Index>Show Index. Make sure Calendars is checked. Update all rules.

Invoke LaunchBar again and type in the name of the calendar you want to use. In my case, I wanted to use icsh. So, with the calendar selected I typed a space, and it was ready for my input of Events or To Do's.
Events are created by entering a description, followed by a date and time specification, separated by an @sign. For example:

To Do Items are created by entering a description, and an optional due due, separated by a right angle bracket (>). For example:

You can press the Tab key to insert the required @ sign more conveniently. And if you press the Tab key again, the @ turns into a >.
Press Return to create the new iCal item. Instead, you can press Command+Return to open the event in iCal and review and optionally amend the item.
Alarms
You specify alarms with leading or trailing exclamation marks for example, !30m, !1.5h, 3d! or 2w!. If no alarm is specified, the default alarm setting of iCal is applied.
Priority
You set priority by appending 1-3 exclamation points.
This makes interacting with iCal so much easier.
In iCal make a new calendar. Give it an unique name: in my case I called the calendar icsh (short for ical schedule).
You can choose not to create a new calendar and use an existing calendar like Home or Work.
In LaunchBar preferences, go to Index>Show Index. Make sure Calendars is checked. Update all rules.
Invoke LaunchBar again and type in the name of the calendar you want to use. In my case, I wanted to use icsh. So, with the calendar selected I typed a space, and it was ready for my input of Events or To Do's.
Creating Events and To-do Items
Events are created by entering a description, followed by a date and time specification, separated by an @sign. For example:
To Do Items are created by entering a description, and an optional due due, separated by a right angle bracket (>). For example:
You can press the Tab key to insert the required @ sign more conveniently. And if you press the Tab key again, the @ turns into a >.
Press Return to create the new iCal item. Instead, you can press Command+Return to open the event in iCal and review and optionally amend the item.
Alarms
You specify alarms with leading or trailing exclamation marks for example, !30m, !1.5h, 3d! or 2w!. If no alarm is specified, the default alarm setting of iCal is applied.
Priority
You set priority by appending 1-3 exclamation points.
Examples:
- Workplace Retreat @ Mar 16 creates an all day event.
- Meeting with Sanjoy @ Apr 20 4-6pm creates an event with a start and end time.
- Watch ManU vs. Liverpool @ next sun 14:45 creates a one hour event at the specified time.
- Trip to New Orleans @ Sept 15 5d creates a multiday event that spans 5 days.
- Call Joe @ tomorrow 3pm 15m! creates an event with an alarm 15 minutes before.
- Buy Butter !! creates a To Do with medium priority.
- Clean the garage > next sun creates a To Do with a due date.
- Pay taxes > May 15 !7d creates a To Do with an alarm 7 days before due.
This makes interacting with iCal so much easier.
Wednesday, April 29, 2009
Unarchiver and Stuffit Expander: Decompressing archived files
The built-in compress and decompress function available in Leopard is good, but sometimes you get files from people in the not-so-popular compressed formats like Tar-GZip, Tar-BZip2, Rar, 7-zip, and so on. How do you deal with those?
There are two very good solutions available: Stuffit Expander and Unarchiver.
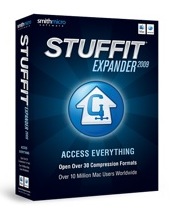
Stuffit Expander is a very good solution available from mysmithmicro. It handles a wide variety of formats and is mainly made available for the company to sell their full-featured Stuffit Deluxe program.
The Unarchiver is a freeware open-source solution.
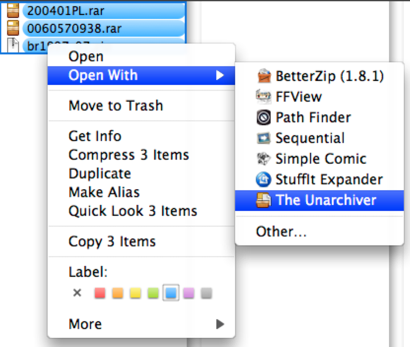
Both programs work the same way. You highlight/choose a compressed file or a bunch of compressed files in the Finder, invoke the contextual menu (right click or ctrl+click the mouse) and a drop down menu shows up. Go to Open With.... and choose any of the two solutions.
Both programs handle the task of decompressing compressed files. They both do it well. Take your pick or since they are both free get both.
There are two very good solutions available: Stuffit Expander and Unarchiver.
Stuffit Expander is a very good solution available from mysmithmicro. It handles a wide variety of formats and is mainly made available for the company to sell their full-featured Stuffit Deluxe program.
The Unarchiver is a freeware open-source solution.
Both programs work the same way. You highlight/choose a compressed file or a bunch of compressed files in the Finder, invoke the contextual menu (right click or ctrl+click the mouse) and a drop down menu shows up. Go to Open With.... and choose any of the two solutions.
Both programs handle the task of decompressing compressed files. They both do it well. Take your pick or since they are both free get both.
Tuesday, April 28, 2009
MailSteward: email archiving solution
I use IMAP which means that a copy of the email is always stored on the server, but I also like having a copy on my hard drive. Problem is that if you do that for a while, soon your Mail mailboxes become huge and then I am always afraid that there will be some kind of corruption of the files and i will lose all the data. Thus the need for an email archiving solution. MailSteward is one of those solutions. MailSteward archives all your email in a database. That gives you the ability to search, browse and get peace of mind that all your emails are safe and protected. MailSteward comes in three versions: Lite ($24.95), Regular ($49.95) and Pro ($99.95). The Pro version is overkill for the individual user but it is probably appropriate for organizations.
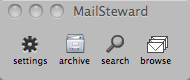
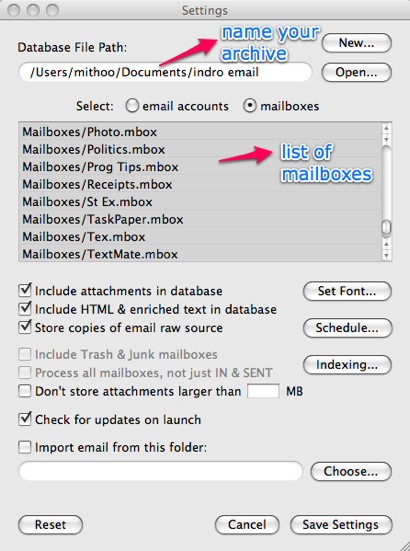
I use MailSteward, the regular version. The figure below shows the main MailSteward window.
The Settings button gives you a choice of which mailboxes you want to archive, what you want to name the file you are archiving, whether you want to include attachments and so on.
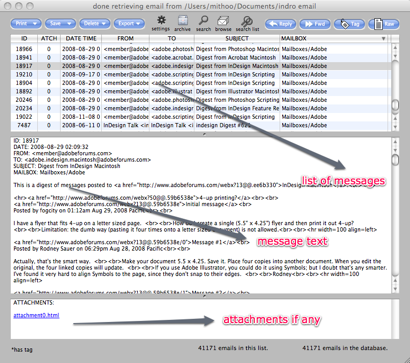
The browse button gives you the ability to look at the database, sort by various criteria and read messages and look at attachments.
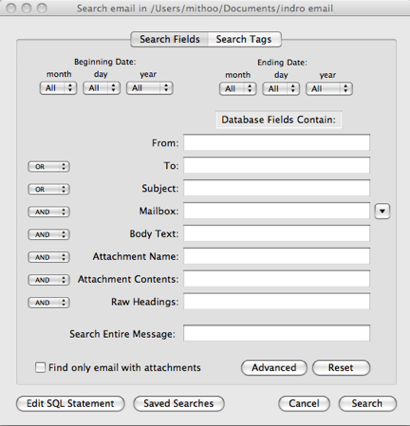
The search field is very extensive and it lets you define searches in a myriad of ways and has the ability to search by fields or search by tags. If you use MailTags, MailSteward has the ability to search by tags that you have inputted using MailTags.
I am obsessive about keeping all my email. I also belong to a multitude of mailing lists which generate a lot of traffic. MailSteward makes it possible for me to have a record of every email I ever get in a database format which isn't tied to any particular program.
Usage: If you belong to a few mailing lists, or feel the need to keep your emails for whatever reason, be they security, knowledge gathering, nostalgia, or just a proclivity towards being a digital pack-rat, you owe it to yourself to explore an email archiving solution. I use MailSteward: I love it and heartily recommend it. I will also in a few weeks talk about two other programs which help me keep my email organized, archived and searchable, EagleFiler and DEVONthink Pro Office.
I use MailSteward, the regular version. The figure below shows the main MailSteward window.
The Settings button gives you a choice of which mailboxes you want to archive, what you want to name the file you are archiving, whether you want to include attachments and so on.
The browse button gives you the ability to look at the database, sort by various criteria and read messages and look at attachments.
The search field is very extensive and it lets you define searches in a myriad of ways and has the ability to search by fields or search by tags. If you use MailTags, MailSteward has the ability to search by tags that you have inputted using MailTags.
I am obsessive about keeping all my email. I also belong to a multitude of mailing lists which generate a lot of traffic. MailSteward makes it possible for me to have a record of every email I ever get in a database format which isn't tied to any particular program.
Usage: If you belong to a few mailing lists, or feel the need to keep your emails for whatever reason, be they security, knowledge gathering, nostalgia, or just a proclivity towards being a digital pack-rat, you owe it to yourself to explore an email archiving solution. I use MailSteward: I love it and heartily recommend it. I will also in a few weeks talk about two other programs which help me keep my email organized, archived and searchable, EagleFiler and DEVONthink Pro Office.
Monday, April 27, 2009
Mindmapping on the cheap

MindNode Pro and MindNode are really easy use to use and cheap software for mindmapping. I specially like the fact that it can output OPML files which makes it possible for me to enhance and look at the files in OmniOutliner and OmniOutliner Pro my favorite outlining applications.
MindNode Pro costs only $14.95 which I thought was great value. MindNode is free.
LaunchBar: Open Multiple files at once
This is one of the cool tricks you can use for LaunchBar 5.0 Beta.
Step 1: Make a folder in your documents folder (cmd+n). Name it. Choose a small name. In this case "lbb" is the name I chose.
Step 2: Make aliases of the files you want opened (cmd+l). Or, just highlight the files in the folder, hold down the cmd and opt key and drag the files into the folder you created. If you noticed, what you dragged are file aliases and not the actual files. Alias files are distinguished by having the little squiggly arrow in the bottom left corner of the icon.
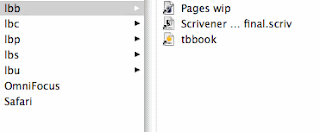
Step 3: Now go to LaunchBar. Update the index. Type in the name of the folder you want. In this case, "lbb". Hold down the Ctrl key and hit return.

Voilà. You have all the files you wanted loading automatically.
Usage: You might have noticed that you work in sets. A set of files/applications when you are online, a different set of files/applications when you are doing web research, a different set of files/applications when you are doing homework. You can set up specific folders for all these tasks and have aliases of the files/applications in them, that way when you need to switch between tasks, you launch the contents of a particular folder instead of each of the items individually. Saves time and makes you feel like a LaunchBar guru.
Subscribe to:
Posts (Atom)